If your yarn comes in the form of a hank when you buy it, you need to wind it before you can start crocheting or knitting with it. In this blog post, I will guide you through the process of winding your yarn into skeins with a yarn swift and a yarn winder.
If you think that hanks are an extra special, beautiful treat, then you’re not alone. I looooooove looking at the beautiful Unicorn hanks. I almost don’t want to use them. Well, just almost!
But when it comes down to it, yarn hanks need a little extra work before you can start knitting or crocheting your project since the yarn isn’t ready to be used yet. To avoid an absolute tangled mess, you must first wind your yarn into a skein.
Luckily, it’s both a fast and easy process to wind your yarn if you have a yarn swift and a yarn winder at hand.
In this blog post, I will guide you through the process of:
Are you ready to wind your yarn? Find your tools, and let’s get started!
Don’t have a yarn swift or a yarn winder? Don’t worry - you can also wind your yarn by hand.
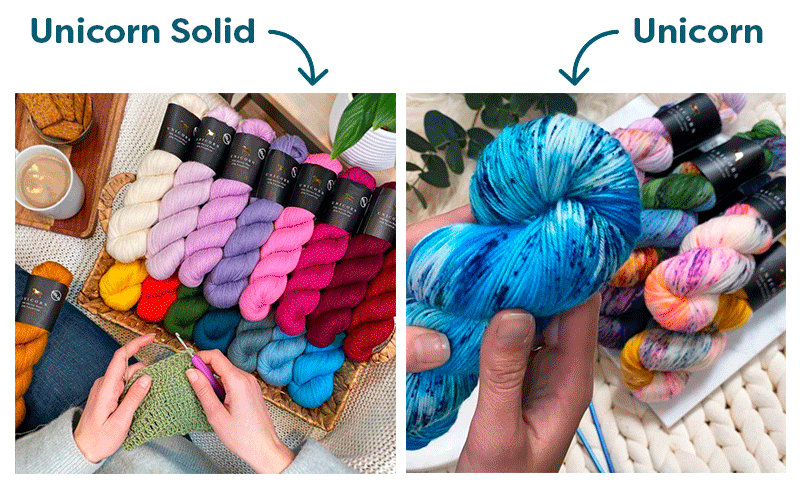
Both our yarns Unicorn Solid (on the left) and Unicorn (on the right) are bought as hanks. You must wind them into skeins before you use them.
Using a yarn swift and a yarn winder together
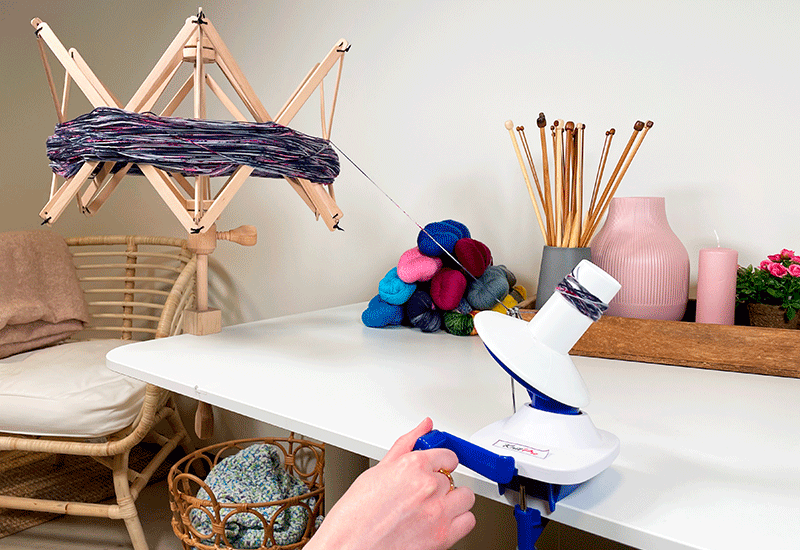
A yarn swift and a yarn winder are the ultimate tool dream team when you need to transform a hank into a skein. The yarn swift holds the yarn in place while you wind the yarn into a skein with the yarn winder.
Thus, these two tools will come in handy for the enthusiastic knitter or crocheter who regularly buys hanks. With these tools, the yarn is wound quickly and effectively so that you can get started on the really fun part 😍
In the video below, you will learn how to use the yarn swift and the yarn winder together to wind your yarn into beautiful skeins.
How to use a yarn swift
It’s the yarn swift’s job to hold the yarn in place so that it doesn’t tangle and create knots while you're winding the yarn into a skein. You attach it to the edge of a table with a clamp and fold it out like an umbrella.
You can use a yarn swift regardless of what material your yarn is made of.
How to
- Attach the yarn swiftly to the edge of a table with the clamp.
- Take the label off the yarn and gently untwist the hank.
- Cut the strings holding the yarn. Make sure not to cut the yarn. Find the yarn end and cut it loose.
- Unfold the yarn swift, place the yarn gently around it and fasten it.
Make sure that the yarn is placed completely horizontal on the yarn swift.
What to do with the yarn ends
It’s a good idea to fasten the inner yarn end to the yarn swift to keep the yarn from tangling when the yarn swift starts spinning. The outer yarn end is the one you start the winding process with - whether you choose to do so by hand or with a yarn winder.

How to use a yarn winder
It’s time to get out your yarn winder. This is where the fun starts 😁
One upside to the yarn winder is that you can make center pull skeins with it. That way, you can avoid those awkward and annoying situations where your skein takes off across the floor (!) because you’re working from the outside in. That doesn’t sound too bad, does it?
How to
- Attach the yarn winder to the edge of a table and fasten it tightly.
- Work the end of the yarn through the spool arm from the outside and in.
- Place the yarn end in one of the notches on the bobbin.
- Turn the handle so that the yarn starts winding around the bobbin. Hold the yarn and keep a slight tension on the yarn to keep the skein from being too loose.
- Cut the yarn when the skein has reached the size you want, or continue like this until all the yarn is wound.
- Pull your skein off the winder.
Remember to check your yarn for faults while you wind it.

Have fun winding your yarn.
All my love ❤
Get the tools: Yarn swift and yarn winder
Was it eye-opening to see how fast and easy it is to wind yarn with a yarn swift and a yarn winder?
Save time and energy and skip straight to the fun knitting or crocheting part of your project with this dream team set of tools:
{{7500:pull-left}} {{1004530:pull-left}}